Creating Effective Visuals for Journalism
Overview
This lesson is the start of a unit on photojournalism and teaches the foundations of photojournalism and composition rules to Journalism students to enable them to create their own effective visuals to add visual elements and interest to Journalism articles.
Summary
This lesson teaches students the basics of journalism photography to equip them to take and edit photos that add to a written Journalism article and overall enhance the story. This lesson can be completed in one 90 minute or two 45 minute periods.
Title Photo by Akshar Dave via Unsplash.
Background for Teachers
To teach this lesson, teachers should have some experience with mobile photography and should be familiar with basic Journalism photography and photo composition rules, as well as photography copyright and laws pertaining to their state and school community.
More information on these can be found in:
Step 1 - Goals and Outcomes

Learning Intentions:
- Students will be able to apply the rules of photo composition and elements of photojournalism to create visuals via mobile photography to add to written articles.
Success Criteria:
- Students will edit and submit their two best photos for their chosen Journalism article, including a caption for each photo.
Step 2 - Planning Instruction

Student Background Knowledge
Prior to this lesson, students will need to have an understanding of the overall goals of Journalism and the values and guidelines of the publication they are creating content for. It helps if they have previous photography experience, though most students will at this point have an Instagram account and be at least familiar with the basics of their phone cameras and free editing tools available to them.
Strategies for Diverse Learners
The benefit of a photography assignment for diverse learners is that the language barrier can be lower, though good tools for intervention and support would be to translate instructions into different languages and showing students clear example of what they need to create. Students who are visually impaired might still be able to participate in this assignment by co-creating visual description and alt text for photos and give input on how to improve these accessibility features.
Step 3 - Instruction

1. Opener: Ask students to find a (school-appropriate) example of a good photo accompanying a professionally published Journalism article and one they would consider bad. Ask them to justify their answers in 2-3 sentences and point out specific things that work well or could be improved. Students share to their table groups, then call on 2-3 groups to share examples with the whole class.
2. Introduce students to the Digital Learning Hub, resources linked, and how to use them for assignments.
3. Guide the students through this slideshow on photojournalism guidelines and have them add their notes. Give students time to discuss and process notes with a partner/with a group in 20-minute intervals. Note: This can be split into two periods by focusing on composition dos and don'ts first and then coming back to caption-writing the next period.
4. Watch this video on 9 Photo Composition Rules using Steve McCurry's work:
Pick 3 of the 9 composition rules shown in the video above and go around the school (or your house or neighborhood) and take one photo that illustrates your use of each rule. Try to make common objects or people look interesting or fresh with these rules. Add each photo to a Google Doc, title it "Photo Scavenger Hunt" and under each photo, describe what you did to use the rule in your photo and what you learned from this.
5. FIND SOME INSPIRATION PHOTOS/ART: Go to Google Jamboard and hit the + in the lower right corner to make a new board. Name it "Visual Deadline Plan and today's date." Add at least 3-5 photos for your chosen topic from sites like Google Images, Pexels, or Unsplash and add sticky notes to each photo explaining what you like about this photo and how it inspires you to create the visual (photo or art) you are planning to create. Here's an example of what your boards should look like.
- Add a text box at the bottom of your Jamboard, answering the following questions:
- What is your overall idea for the visual you'll be creating for this week's deadline?
- What ideas or elements from the inspiration pictures you found helped you create this idea?
- How are you going to create and edit your visual deadline? Be specific. Tell how you'll go about taking the photo, what tools, people, or props you need, and make a timeline for taking your visual, as well as any editing time you may need
6. Visual Deadline Assignment:
- Choose an article from the current folder(s) of articles your staff is working on and leave a comment on the top of that article with your idea for the photo for it.
- Take a photograph that is relevant and adds to the topic of your chosen article. Upload your 2 BEST photos for this assignment.
- Make sure your photograph (or art, if you’re illustrating an opinion piece) pays attention to the following:
- your photo needs to tell a story
- your photo needs to be focused on a subject
- your photo needs to show action
- take your photo at an angle that shows context
- Write a 1-2 sentence caption for your photo
- Upload your finished and edited photos on Canvas and the Shared Drive (Photos folder). On Canvas, add a comment to your assignment with the caption you've come up with for your photo.
Project Examples:
Step 4 - Assessments

Student notes and their scavenger hunt will serve as formative assessments of this unit. Their completed visual deadline serves as the summative assessment.
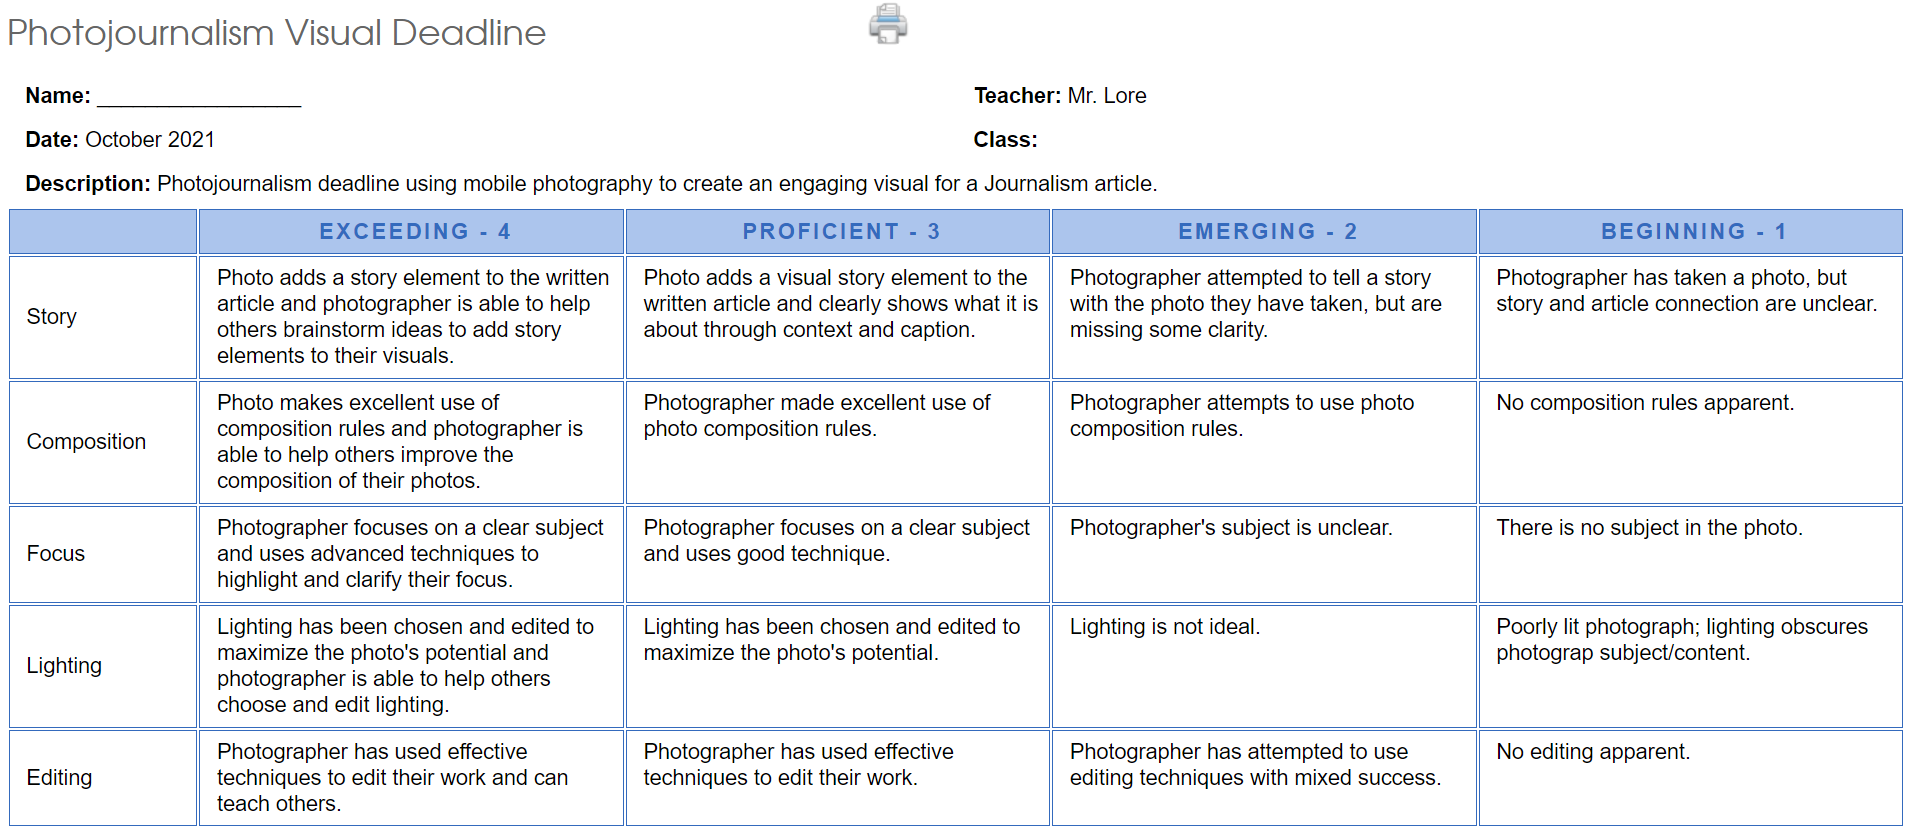
Example Rubric: