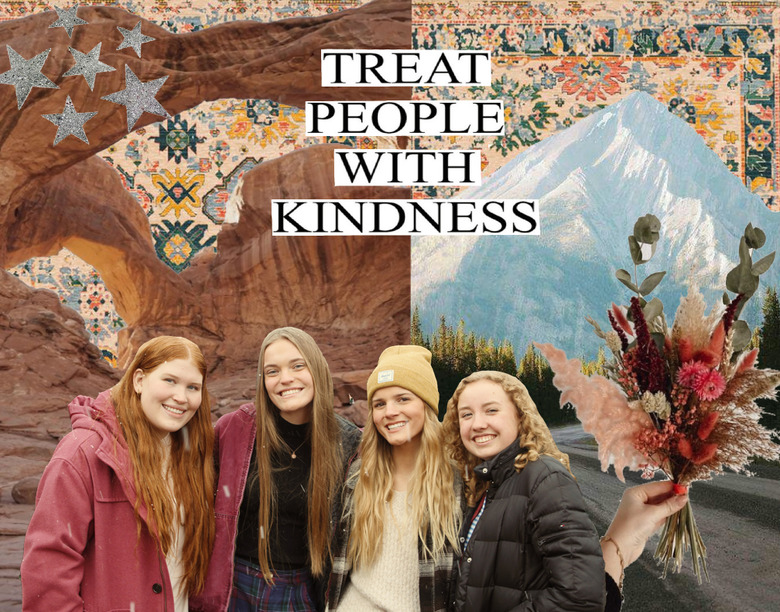
Digital Self Portrait Collage
Overview
This Lesson is to teach Graphic Design Student How to Design a Charming Collage Composition Using Adobe Photoshop.
Summary
In this lesson, students will create a realistic or abstract digital self-portrait. Students will create multiple layers and use digital techniques within a technological application
- 2-3 Class Periods
- Face to face computer lab with Adobe CC installed
Background for Teachers
Learning the design process
Students should ask themselves:
- How can I communicate ideas visually?
- How can I communicate my values visually?
- How can I communicate my feelings visually?
- How can I use symbols and visual metaphors to communicate?
- How can I create emphasis, unity, depth, repetition, etc. to be more effective?
- How can I make this say something about who I am?
- How can I learn new skills or how I achieve mastery of older skills?
Before starting this assignment student need to understand what Visual Elements (art elements) are: (see the Composition and Design page for details)
- Color - Line - Shape - Value (light and dark tones) - Volume (form) - Texture
The Design Principles or rules (some creative artists purposely break rules) are:
- Emphasis - some say "Center of Interest." Most artists put it a bit off center. Some artist avoid it on purpose. They want all parts of the work to be equally interesting.
- Harmony - complex but pleasing visual combinations are harmonious.
- Unity - when nothing distracts from the whole you have unity. Unity without variation can be uninteresting - like driving through western Kansas on the interstate.
- Balance is the consideration of visual weight and importance.
- Symmetrical balance implies that both sides are the same. Gothic cathedrals are often symmetrical with their central emphasis pointing to heaven.
- Asymmetrical balance is more interesting. Both sides are the similar in visual weight but not mirrored.
- Radial balance is not used much, but it is like a daisy or sunflower with everything arranged around a center. Rose windows of cathedrals use this system.
- Depth - effects of depth, space, projection toward the viewer add interest. In the real world atmospheric perspective causes colors and shapes to get blurrier and foggier in the distance. Linear perspective in the real world makes things look smaller in the distance. Some artists try to avoid depth by making large things duller and small things brighter, and so on, to make the objects contradict realism. Many artists don't believe in realism even though they could do it if they wanted to. It seems too boring to them. Realism wouldn't be art for some artists.
- Variety - You create variety when elements are changed. Repeating a similar shape but changing the size can give variety and unity at the same time. Keeping the same size, but changing the color can also give variety and unity at the same time. In visual composition, there are many ways you can change something while simultaneously keeping it the same.
- Repetition - Some ways to use Repetition of the Visual Elements are:
- Size Variation can apply to shape, form, etc.
- Repetition can be used on all of the Visual Elements.
- Variation can be used with all of the visual elements. See "Variety" above. You can do this with all the elements. Artists do this all the time.
- Transparency and overlapping in varying degrees can create depth and connections.
Step 1 - Goals and Outcomes
Content Objectives
Students will use their own image and images of things, persons, objects, words, etc. that are in some way significant to them.
Students will be able to demonstrate the Elements and principles of Design
The Visual Elements
- Color - Line - Shape - Value (light and dark tones) - Volume (form) - Texture
The Design Principles or rules (some creative artists purposely break rules) are:
- Emphasis - some say "Center of Interest." Most artists put it a bit off center. Some artist avoid it on purpose. They want all parts of the work to be equally interesting.
- Harmony - complex but pleasing visual combinations are harmonious.
- Unity - when nothing distracts from the whole you have unity. Unity without variation can be uninteresting - like driving through western Kansas on the interstate.
- Balance is the consideration of visual weight and importance.
- Symmetrical balance implies that both sides are the same. Gothic cathedrals are often symmetrical with their central emphasis pointing to heaven.
- Asymmetrical balance is more interesting. Both sides are the similar in visual weight but not mirrored.
- Radial balance is not used much, but it is like a daisy or sunflower with everything arranged around a center. Rose windows of cathedrals use this system.
- Depth - effects of depth, space, projection toward the viewer add interest. In the real world atmospheric perspective causes colors and shapes to get blurrier and foggier in the distance. Linear perspective in the real world makes things look smaller in the distance. Some artists try to avoid depth by making large things duller and small things brighter, and so on, to make the objects contradict realism. Many artists don't believe in realism even though they could do it if they wanted to. It seems too boring to them. Realism wouldn't be art for some artists.
- Variety - You create variety when elements are changed. Repeating a similar shape but changing the size can give variety and unity at the same time. Keeping the same size, but changing the color can also give variety and unity at the same time. In visual composition, there are many ways you can change something while simultaneously keeping it the same.
- Repetition - Some ways to use Repetition of the Visual Elements are:
- Size Variation can apply to shape, form, etc.
- Repetition can be used on all of the Visual Elements.
- Variation can be used with all of the visual elements. See "Variety" above. You can do this with all the elements. Artists do this all the time.
- Transparency and overlapping in varying degrees can create depth and connections.
Step 2 - Planning Instruction
Student Background Knowledge:
Utah USBE CTE Digital Graphic Arts Intro STRAND 2
Students should already have knowledge of the design process.
Standard 1
Understand the process of planning a document.
- Understand the importance of preplanning a project including creating thumbnail sketches.
- Understand the importance of preplanning a project in terms of audience, purpose, timeline, page arrangement and production method.
Standard 2
Understand the principles and elements of design.
- Identify and utilize the following principles of design: balance (formal/symmetrical, informal/asymmetrical), contrast, emphasis, movement, unity.
- Identify and utilize the following elements of design: line, shape, value, texture, color, space (incl. positive and negative), form.
Standard 3
Understand the proper use of color in publications.
- Understand the difference between the two basic color modes CMYK and RGB.
- Create variations of color using tint, patterns, gradients, and opacity.
Performance Skill
Use planning, principles and elements of design, and color to compose a composite design in Adobe Photoshop.
Standards being taught in this Lesson
Utah USBE CTE Digital Graphic Arts Intro STRAND 5
Students will understand raster images.
Standard 1
Know basic operations of tools, panels, and menus in a painting/photo editing application (i.e. Adobe Photoshop, GIMP).
Standard 2
Define, create, manipulate, and appropriately use bitmap (pixel based) raster graphics.
- Identify raster graphic formats and their appropriate use (e.g., JPG/JPEG, GIF, TIF, BMP, PSD, PNG, etc.).
- Acquire image assets (i.e. scan, digital camera, internet search, stock sources, etc.).
- Import/export images for project requirements (compression, resolution-such as 72 points in an inch).
- Crop, resize, straighten, and transform an image.
- Use layers, mask, and selection tools.
- Apply filters and effects.
- Adjust color, contrast, create gradient.
- Apply and maintain transparency or Alpha channels.
- Restore images.
- Utilize color selection techniques.
- Operate painting and drawing tools.
- Practice basic keystroke and shortcut keys.
*Strategies for Diverse Learners
Here are a few extra tutorials and videos to help students that may want a little more inforamtion, tips, and tricks.
- https://helpx.adobe.com/photoshop/how-to/compositing.html
- https://edex.adobe.com/teaching-resources/c5c21d9a39/preview?selectedIndex=2
Step 1
Pre-Collage Questionnaire: Answer these questions before you start your collage. This will help you gather ideas for images and items to select.
Questions about you:
1. What makes you unique?
2. What are some of your interests/hobbies?
3. What is your favorite musician or music group?
4. What are your favorite foods?
5. What is one activity that you like to do with your family?
6. What are your favorite places to go with friends?
7. What are some of your strengths?
8. Name three people who are important to you? Why?
9. Who are your role models? Why?
10. Describe one significant event that happened in your life. Why was it important?
11. What are some of your family traditions?
12. What are some places that are important to you? Why do you like to go there?
Step 2:
Learn How to Design a Charming Collage Composition
SUBMIT AS A PSD (PHOTOSHOP FORMAT)
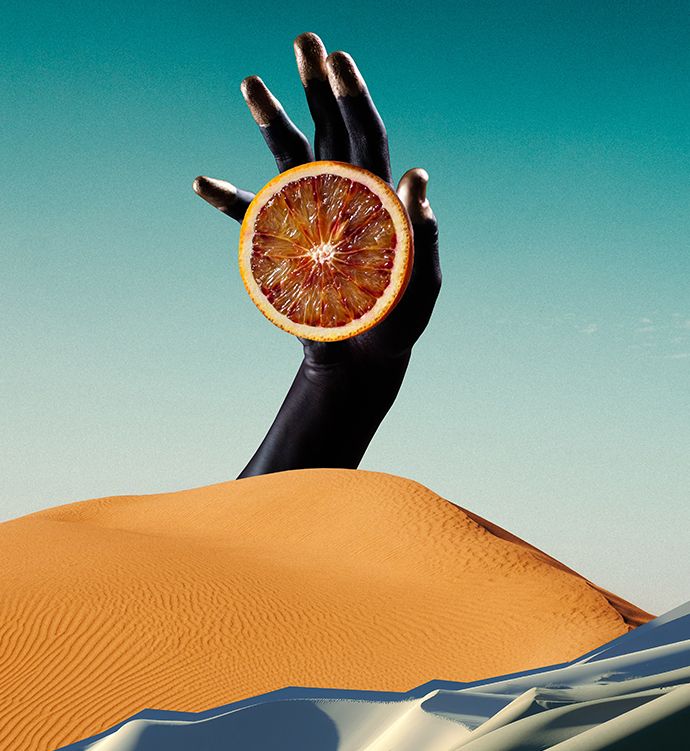
Craft surreal images using digital photomontage.
Size 14" X 11"
Photo collages bring dreamlike visions to life.
Fine art photographer and visual artist Edwin Antonio describes photomontage as “a vision, a dream that an artist has, which takes multiple images to create.” Graphic designer and collage artist Lana Jokhadze agrees. “Photomontage gives you the opportunity to create works of art from anything that’s on your mind,” she says. “I used to imagine that I was sitting on a different planet, looking at the sun and Earth side by side. With digital photo collage, I can transfer a vision like that to the screen.”
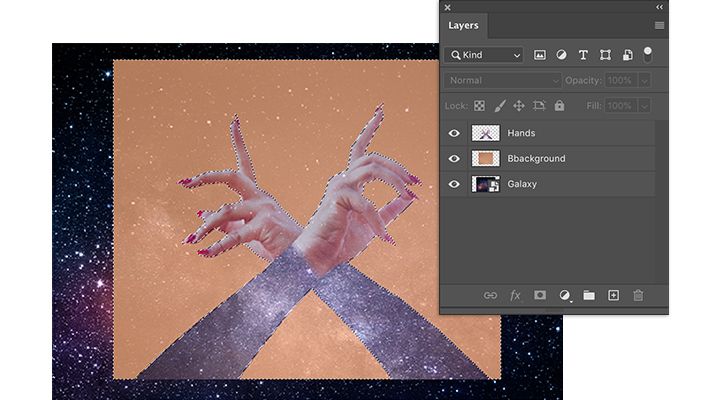
Using Adobe Photoshop to make a digital collage.
As a beginner, don’t be afraid to just play around in Photoshop. Try every tool in the program to familiarize yourself with each one. Have fun with it.” Tools in Photoshop like Selection, the Pen tool, and Layers can help you combine photos into stunning works of art.
Use Selections and Layer Masks to cut out objects.
Remove people or objects from images using Selections and Layer Masks (Links to an external site.). After you make an automatic Selection, you may need to refine your selection (Links to an external site.) manually before applying a Layer Mask. Save after every big change you make and never combine layers.
“Double-check your work too,” adds Antonio. “Make sure all your layers are on and visible when you export your file.” Understanding the basics of Layers (Links to an external site.) can help.
Use the Pen tool for manual tracing.
Select and edit precise paths (Links to an external site.) with the Pen tool to outline items in an image that you want to select and cut out. This process can be helped by using a physical digital stylus and working on Photoshop on the iPad. “My favorite tool is a stylus that I hated at first,” says Jokhadze. “It may seem challenging, but it can do a lot for you.”
Find images to work with on from your Photos.
Imagine that you want to add a photo of the Eiffel Tower to a collage, but you’ve never been to Paris. “A lot of times, you don’t have the perfect images to use,” says Antonio. “That’s where Adobe Stock (Links to an external site.) comes in. It’s a great resource.” You can search Adobe Stock for high-quality photos and graphics from right within the Photoshop app.
Tips for making a great photomontage.
The most important consideration when getting started is exploration of this medium, because it’s so full of possibilities. “The main thing for beginners is to test your abilities in different styles,” says Jokhadze. Here are some other helpful tips.
Keep it as real as possible.
Using high-quality photos makes a huge difference.
Create the look of consistent lighting.
Adjust the exposure (Links to an external site.) or use Lighting Effects (Links to an external site.) to help match the sources of light in the different images you are combining. Manipulating the white balance (Links to an external site.) in each photo can also help keep colors and temperature consistent, making for a more realistic composite.
Be adventurous, but have a plan.
With photomontage, there’s truly nothing you can’t depict, so don’t hold yourself back. “Be creative, be adventurous when it comes to creating your own world. But make a plan for what you want to create ahead of time so you don’t get distracted and you can focus on your goal.
Photomontage first steps.
Embark on creating a surrealist masterpiece today with these jumping off points.
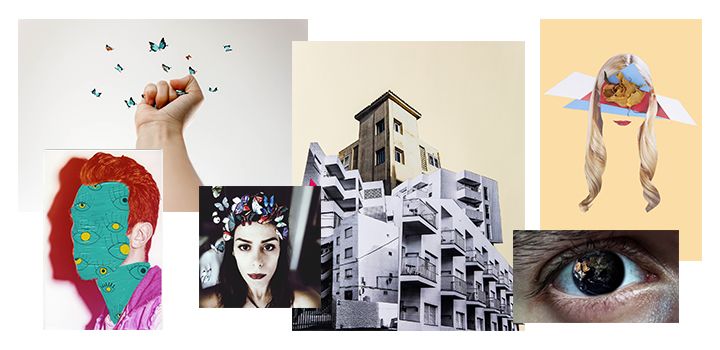
Find work you admire.
“I used to look at the collages of different artists I liked before I got started,” says Jokhadze. With platforms like Instagram and Behance (Links to an external site.), it’s easier than ever to kick-start your creativity by seeing what other photomontage artists are making.
Start with a step-by-step.
Here are some tutorials to help build your photomontage skills:
- Follow along and create your first digital photo composite (Links to an external site.).
- Try this how-to and make more complex selections for an evocative digital collage (Links to an external site.).
- For a quick challenge, see how to change the background of a photo in 60 seconds (Links to an external site.).
- Learn some ways to remove and add objects with this step-by-step (Links to an external site.).
With its endless options and incredible history, the art of photomontage is an ideal genre for building skills in digital design. Jump in as a beginner and put together a simple collage or grow your talent in Photoshop with a more complex composite.
Contributors
Edwin Antonio, (Links to an external site.) Lana Jokhadze (Links to an external site.)
Step 3 - Instruction
Students are shown images of contemporary collage artists. Students are given background information and definitions of the art terms: Collage, mixed-media, tradition, variety, contrast and unity. Students reflect and write about things that make them unique such as culture, language, music, food, etc.
Powere Point LINK
Students will go on a Photo Walk to collect photos for their Collage
Studnets will upload their photos and individual edit the chosen 5-10 photos
In a Photo editing App student will combine the photos to create a Self Portrait Montage/Collage
Learn How to Design a Charming Collage Composition
SUBMIT AS A PSD (PHOTOSHOP FORMAT)
Craft surreal images using digital photomontage.
Size 14" X 11"
Photo collages bring dreamlike visions to life.
Fine art photographer and visual artist Edwin Antonio describes photomontage as “a vision, a dream that an artist has, which takes multiple images to create.” Graphic designer and collage artist Lana Jokhadze agrees. “Photomontage gives you the opportunity to create works of art from anything that’s on your mind,” she says. “I used to imagine that I was sitting on a different planet, looking at the sun and Earth side by side. With digital photo collage, I can transfer a vision like that to the screen.”
Using Adobe Photoshop to make a digital collage.
As a beginner, don’t be afraid to just play around in Photoshop. Try every tool in the program to familiarize yourself with each one. Have fun with it.” Tools in Photoshop like Selection, the Pen tool, and Layers can help you combine photos into stunning works of art.
Use Selections and Layer Masks to cut out objects.
Remove people or objects from images using Selections and Layer Masks (Links to an external site.). After you make an automatic Selection, you may need to refine your selection (Links to an external site.) manually before applying a Layer Mask. Save after every big change you make and never combine layers.
“Double-check your work too,” adds Antonio. “Make sure all your layers are on and visible when you export your file.” Understanding the basics of Layers (Links to an external site.) can help.
Use the Pen tool for manual tracing.
Select and edit precise paths (Links to an external site.) with the Pen tool to outline items in an image that you want to select and cut out. This process can be helped by using a physical digital stylus and working on Photoshop on the iPad. “My favorite tool is a stylus that I hated at first,” says Jokhadze. “It may seem challenging, but it can do a lot for you.”
Find images to work with on from your Photos.
Imagine that you want to add a photo of the Eiffel Tower to a collage, but you’ve never been to Paris. “A lot of times, you don’t have the perfect images to use,” says Antonio. “That’s where Adobe Stock (Links to an external site.) comes in. It’s a great resource.” You can search Adobe Stock for high-quality photos and graphics from right within the Photoshop app.
Tips for making a great photomontage.
The most important consideration when getting started is exploration of this medium, because it’s so full of possibilities. “The main thing for beginners is to test your abilities in different styles,” says Jokhadze. Here are some other helpful tips.
Keep it as real as possible.
Using high-quality photos makes a huge difference.
Create the look of consistent lighting.
Adjust the exposure (Links to an external site.) or use Lighting Effects (Links to an external site.) to help match the sources of light in the different images you are combining. Manipulating the white balance (Links to an external site.) in each photo can also help keep colors and temperature consistent, making for a more realistic composite.
Be adventurous, but have a plan.
With photomontage, there’s truly nothing you can’t depict, so don’t hold yourself back. “Be creative, be adventurous when it comes to creating your own world. But make a plan for what you want to create ahead of time so you don’t get distracted and you can focus on your goal.
Photomontage first steps.
Embark on creating a surrealist masterpiece today with these jumping off points.
Find work you admire.
“I used to look at the collages of different artists I liked before I got started,” says Jokhadze. With platforms like Instagram and Behance (Links to an external site.), it’s easier than ever to kick-start your creativity by seeing what other photomontage artists are making.
Start with a step-by-step.
Here are some tutorials to help build your photomontage skills:
- Follow along and create your first digital photo composite (Links to an external site.).
- Try this how-to and make more complex selections for an evocative digital collage (Links to an external site.).
- For a quick challenge, see how to change the background of a photo in 60 seconds (Links to an external site.).
- Learn some ways to remove and add objects with this step-by-step (Links to an external site.).
With its endless options and incredible history, the art of photomontage is an ideal genre for building skills in digital design. Jump in as a beginner and put together a simple collage or grow your talent in Photoshop with a more complex composite.
Contributors
Edwin Antonio, (Links to an external site.) Lana Jokhadze (Links to an external site.)
Step 4 - Assessments
Digital Self Portrait Collage
Violation of Copyright (use of non-original images or graphic elements) will result in failure for the project. All photography and image processing must be your work.
Area of Focus | Excellent High Achieving 20 points each | Average Moderate Achieving 16 points each | Below Average Poor 13 points each | Score |
Assignment Specifications/ Requirements (Subject matter, number of images, resolution, etc.) | Strong choice of subject matter. Images are edited, enhanced to achieve the most striking photograph/image. Proper sizing, resolution, etc. Photos/Project fully meets or exceeds requirements. | Images meet the minimum level of quality and subject matter to satisfy the assignment. Subject matter could be improved; some images seem to be filler material. Shows evidence of some requirements. | Subject matter does not satisfy assignment. Images are missing. Shows minimal to no evidence of requirements or no work submitted. |
|
Composition (Rule of thirds, leading lines, Angle of View, etc.) | Strong composition because of layout and placement of camera to subject as well as effective use of compositional techniques. Demonstrates exceptional visual interest. | Image composition has potential, but other angles, positioning of subject and use of compositional techniques will improve your image. Demonstrates some visual interest. | Little to no consideration of basic photographic composition techniques. Backgrounds may be busy or distract from the focal point. Does not demonstrate visual interest. |
|
Concept/Content/Theme
| Strong and effective concept. Idea is communicated well. Images thoroughly address the theme/topic or subject. Thorough evidence of imagination, creativity and thoughtfulness. | Ideas are not fully communicated. Images somewhat address the theme/topic. Some evidence of thoughtfulness. | Weak connection to the theme/topic. Unclear – photos seem random. Little to no evidence of thought, creativity. Further brainstorming ideas is recommended. |
|
Image Quality (Exposure, focus, color, depth of field) | Correct exposure for the setting. Use of color (and/or grayscale) coincides with the subject and the mood of the image. Focus and depth of field effectively contribute to a powerful image. | Photo taken at appropriate exposure. Use of color (and/or grayscale) adequate. Focus and depth of field somewhat adequate. | Some or most images are too dark or too light distracting form the subject or mood of the photo. Use Photoshop exposure tools to correct this. Focus and depth of field do not follow project guidelines, image out of focus, poor depth of field. |
|
Creativity/Originality | Amazing photograph/project. Well organized, unified meaning. Interesting, different, effective, unique approach to assignment. Excellent photo editing, enhancement. | Good approach showing some creativity but could have been planned, executed and enhanced to achieve a more powerful image. | Photo shows little to no creativity. Dull, lacks impact. |
|